
So, the idea of walking out your backdoor and stepping onto a glass-smooth rink excites you? Here are important tips to consider before you go buy the materials to make an ice rink at home.

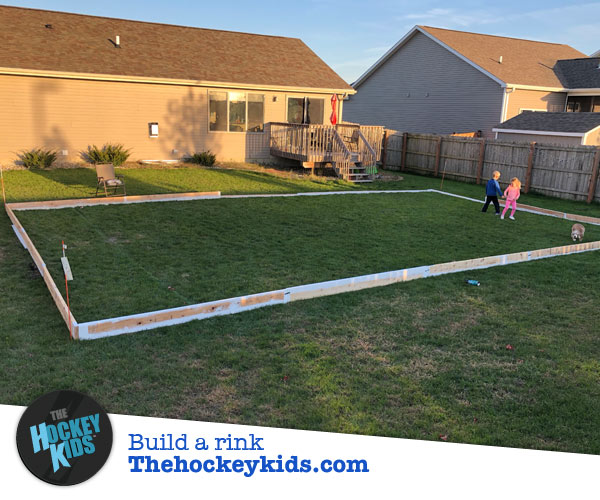
You'll need to measure your yard's flat area and determine the dimensions of your rink. Our yard has a relatively flat area of about 24 feet by 40 feet.
Place some markers in the yard to plot the area, one stake at each corner should do. If needed, level out any spots in your soil or sand (and grass seed in the fall) as this can reduce your use of excess water when you fill.
Make sure you can easily reach your rink with a garden hose or other water source.
Clean up any debris where the tarp will lay, you don't want any holes puncturing the tarp and draining out your water. Sticks, leaves, pet surprises - get it nice and clean.
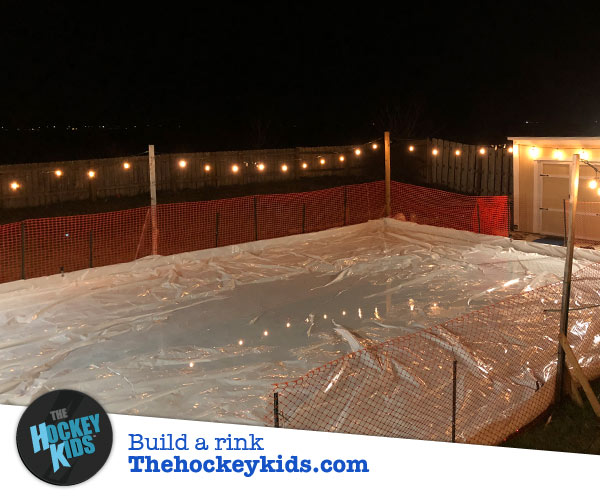
Fence it off. If you don't have high boards, you don't want anything entering the rink area, especially if you're going to be building over several days' time. Pets can easily injure themselves on ice, or do some real damage too - you don't want to skate on yellow ice! A nice snow fence should work to keep things out of the area.
Prepare to spend the better part of an afternoon laying out your boards and building the frame. Check with a laser level to make sure you have boards that allow for the high side to be filled with at least 4 inches of water.
Here's a list of things you need to buy from the hardware store.
Pro Tip: You will want a second set of hands for some of the work, you can't do it all solo.
Screws: At any hardware store a 2" board is actually about 1 1/2" thick. When screwing connector plates in from this direction, a 1" screw is about all you want. At no point should a screw be coming through the other side or sticking out from the boards, or this can easily puncture or tear your tarp.
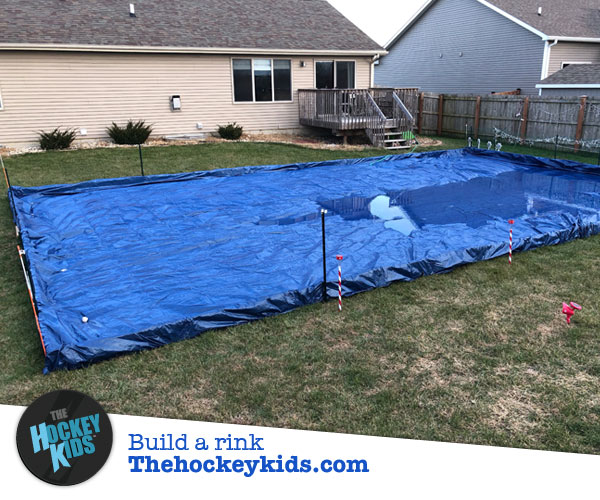
Make sure you have a tarp larger than your area by a few feet in both directions. It will need to flow up and over the boards, as well as have some slack for any dips in the yard. 4 feet or longer than the width is recommended when using 8-inch boards.
Example:
24' x 40' rink size = 30' x 50' tarp
Your hardware store may not carry every size and color, but I'd recommend you find a white color tarp that's at least 3 feet longer than the frame you plan to build. We got a 30x50 blue tarp for our first season because it was cheap and this was a trial run. I suspect that the blue tarp color attracts more sunlight and thus heat to melt the ice faster on warm days. Next year we'll upgrade to a white tarp to ensure less melting on mild and sunny days.
Be careful not to damage the tarp with sticks, shoes, rocks or shovels. The last thing you want is a hole in your rink.
A shaded area can keep direct sunlight away, but likely means you have leaves falling. These little guys will stick to the ice and attract heat, melting tiny holes in the midday sun. Get rid of them before they mess up your rink!
2018, 1st year
2021, 4th year
An extra set of hands helps, but you should be able to lay your boards out in the perimeter you staked out earlier. Start with a corner and pre-drill holes for 2 longer screws (3" should work fine). Drill holes through both boards and secure the L-shaped corner. Then begin working your way along the perimeter with screw plates to join boards that run along the same side of your rink. Stabilize the boards with plastic tent stakes so they don't begin to fall over as you're working.
For good measure you may want to verify you have 90-degree angles and the proper length and width before finishing your frame. Remember the tarp will flow up and over the boards.
If you encounter lower areas along your frame, find extra 2x4 boards or add some dirt under your grass to help level out the area of your yard the rink boards will sit on top of.
Check boards with a level and ensure all 4 sides are level. You want to prevent any shifting, or worse, a complete blowout of one side of your rink boards when you fill!
We chose to add a small fence on one end, to prevent pucks from flying off the rink. For this setup, a few 4-foot metal fence posts with clips and a 25-foot plastic garden fence roll worked just fine. The fence posts add additional support to the frame too. We've since upgraded the size of the fence and added netting as the kids shot power has increased... Sorry neighbors!
Remove any interior tent stakes once the frame is up and stable, you don't want these to damage the tarp.
You'll also need to run your garden hose for several hours, depending on the size of your rink. For a 24 x 40 frame in our yard, the first fill ran about 8 hours!
Pro Tip: You will want to be home for the duration of your fill, in case anything goes wrong and you need to shut the water off. For this reason, starting your fill early in the morning is recommended.
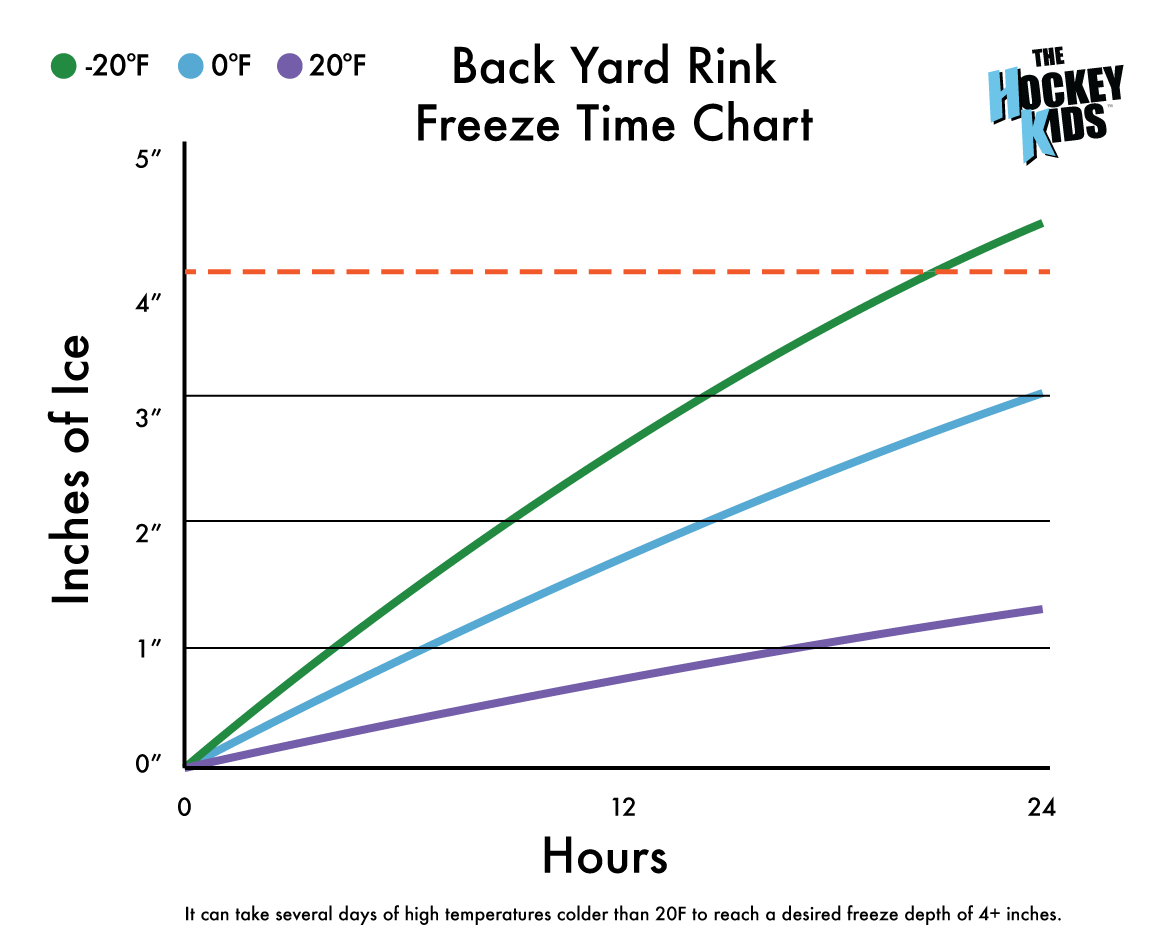
1989 Princeton ice growth research
Don't fill too early in the season. A good rule of thumb is to wait until after Thanksgiving to lay down a tarp, but your weather situation will vary, don't kill your grass by starting early.
People often ask, "how's your grass"? If you fill at the right time, and get the tarp up soon enough in the spring, the grass is actually greener under the tarp. We fill in late November and pull things up in late Febrary or early March with no grass damage at all.
Watch the weather forecast and try to fill the rink 12 to 24 hours before a good solid drop in temperatures. The ice may take several days to freeze completely, so you need a string of colder days before you should fill up with water.
Be patient.
When the winter chill arrives, layout your tarp. Ensure it is flat as possible, ripples and bumps are not a deal breaker, but you should spend a little time making sure it's nice and flat.
Roll the excess tarp under your boards to hold it in place, while ensuring the tarp is flat against the ground and the boards. Keep any stakes to the outside of your boards so they gently touch the tarp and still help support the boards from bowing outward.
Flood the rink with water and let it freeze. This will take several hours... Skate and resurface with warm water as needed throughout the season. Enjoy!
For a small to mid-sized rink, you don't need a crazy setup to do resurfacing. Several 5-Gallon Buckets of hot water will do the trick to melt to top layer and level things out.
You can use a simple PVC Rink Rake setup to pull the hot water around and spread it out before it freezes, but that's not required. Just make sure you cover the entire surface evenly with hot water buckets and you should be fine.
Our rink started out in 2018 as a 24x40 foot layout. Estimated costs:
* We used a cheaper blue tarp in year one which caused melting, and didn't hold water as well. We ended up using more water than with a reliable white tarp. The expense of a good tarp is worth it, with the increased ice time and reduced need for extra water to keep up with melting and evaporation.
Some of the materials are reusable for multiple seasons, others will break or need to be replaced over time. Since our initial build, we've gone larger and upgraded lights, etc.
Upgrades over the last few years:
Ordering a new tarp each season is a good idea, as you might not know your old one has a puncture until you fill. We have reused and refilled in the past, but it's a gamble and waiting for a new one on order might mean you can't fill or skate for a couple of weeks if you discover damage when you're filling.
Compare the costs, and value the fun... ice arena time is not cheap. If you factor in driving time, ice arena expenses, and just the sheer fun, it's relatively cheap per hour of ice time and you have incredible memories skating at home each winter with family and friends.
We plan on making modifications to our rink next year, and any tips or tricks we can learn are appreciated. Send us your comments and rink photos on our Facebook page!